
Drywall, also known as sheetrock, plasterboard, bluster board, or gypsum board, is a light-weight interior wall system. It is popularly used for partitioning interiors. Drywall is one of the most preferred choices of construction for a wide range of applications in schools, hospitals, theatres, hotels, and industries. If you are planning to install drywall in your home, then the first obvious question that comes to mind is how to hang drywall or how to install drywall? Here is an article with answers to all your questions regarding drywall or sheetrock installation.
How to Install Drywall?
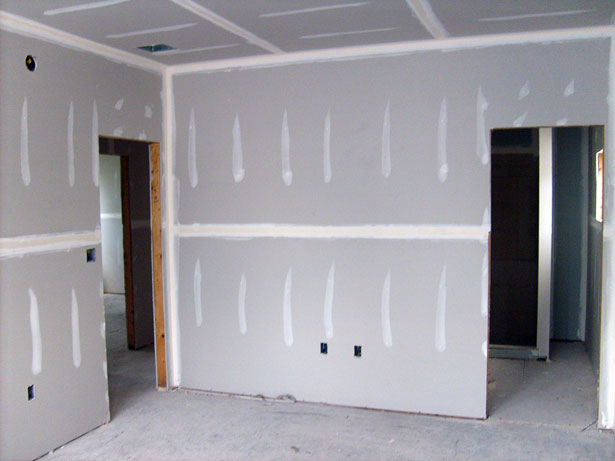
Thinking how to hang drywall or how to install drywall? Relax! Trust me, sheetrock installation or installing drywall is not rocket science, but it will go smooth and faster if you go through the fundamentals before carrying out the process of sheetrock installation. Learning how to hang drywall is an easy task, and it is within reach of every DIY enthusiast. With appropriate tools, friend’s help, and patients, sheetrock installation is not a tough task. Below mentioned are some of the steps that you can follow to hang the drywall.

Step 1: Take Measurement of the Wall
Take precise measurements of the wall. After taking the measurement, cut the sheet of drywall in a way that the sheet is ¼ inch shorter than the measurement of the wall. Have someone’s help to support the drywall upwards and position is correctly and tightly against the ceiling.
Step 2: Put Screws into the Sheet of Drywall
Drive the drywall screws precisely in the center of the sheet at an appropriate height. Once you put the first screw at the correct pace, but the rest of the screws from the middle position of the panel and move towards the outside. Always remember to drive the screws at a distance of 16 inches and put them into all the studs.
Step 3: Add Other Drywall Sheets
Hang the additional drywalls horizontally as lessens the numbers of tapping needed. Place the joint at a suitable height. Keep in mind that a longer wall might require more than one drywall sheet. In such a case, utilising a drywall lift can help you in efficiently carrying out the procedure of hanging drywall.
Start hanging the additional sheets as before. Pin it at the right place, and then put screws at a distance of 16 inches as well as in the studs.
Step 4: Doors, Windows and Other Installations
- Plan for Windows: If the drywall sheet is covering a window that is not yet installed
- In such a case, cover the window using the drywall and make a mark for the corners of the window using screws. Use a drywall router and plunge it into the window’s center and cut vertically, as well as sideways, until you get the edge of the window.
- Plan for Windows: If the window is already installed
- In such a case, take the trim of the window, and before hanging the sheet of drywall, cut the opening of the window. Cut the sheet by positioning it along the floor and marking the bottom edges of the window. In order to mark the edges of the window, take appropriate measurement from the ceiling to the top of the window.
- Plan for Door: Layout the cut of the door and cut it in a similar way as the window.
- Eliminate the trim. Mark the locations of the studs, and make a line marking the openings of the door. Use a router to make cuts for the doors and the windows, and use the drywall screws to screw the panels.
- Plan for Wall Fixtures: Utlise spiral saw. Mark the height of the fixture and make marks on the sheet to note its position. Remove the wires. Put screws the drywall at the needed place, by managing to cover the box appropriately. Use sufficient screws to put the drywall at the right place. Find the edge of the fixture by using the spiral saw and cut from the sides to the edges following a counterclockwise direction.
Step 5: Final Sheet of the Drywall
Cut the drywall in size ¼ shorter than the measurement so that it could fix appropriately in the corners and the panel that was last installed. Screw the sheetrock at the right place. Using a utility knife, cut a V-groove into the non-tapered ends where the panels meet. It would help in easily hiding the joints while taping.
Step 6: Sheetrock Installation to Reach the Floor and Frame that is Present Outside the Corners
Start covering the bottom row using a shorter piece. Put the piece at the right position and lift it using the drywall lift and screw it at the correct place. After that, install the longer price when the small piece is in the right place.
Consider the below-mentioned tips while framing the outside corners:
- Cut a longer piece of the drywall, so it hangs correctly over the corners
- Trim the corners using the spiral saw
- Protect all the corners using metal corner beads. If the beads are long, then it will twist when you fasten the process. In order to avoid this, cut the bead using tin snips and leave it approximately ½ inch short. Nail the bead and put nails at a gap of 9 inches. Remember not to use a screw as it will twist the bead.
Once you learn the procedure of how to hang the drywall or how to install the drywall, you can easily install it with perfection.

Sizes and Thickness of the Drywall
Drywall is available in the market in different sizes; nevertheless, the most common size is 4’ x 8’ as it is convenient and easy to use. For taller ceilings, there are larger sheets of size 4’ x 12’ and 4’ x 16’; nevertheless, for a home installer, it is quite difficult to use the sheets of this size. These sheets should only be installed by professionals.
The thickness of drywalls range from 1/4” to 5/8”; nevertheless, the most popular is 1/2”. The sheets containing thickness 1/4″ are popularly utilised for repairs. These sheets are also used to overplay the already existing sheets. This is mostly utilised to cover the celinings. These sheets can also be used to create curved walls.
The most common thickness of the drywall is 1/2,” and it is popularly used in ceiling and wall applications. Drywalls that are of the same thickness and are water-resistant are used in bathrooms.
The drywalls of thickness 5/8” are mostly fire resistant and are used in furnace rooms and garages.
Cost of Drywall Installation
The cost of installing drywall is highly determined by the size of the room and the type of drywall you are planning to install. The average cost of drywall of size 1/2″ is approximately $1.30 to $2.00 per sq. Ft.
Drywalls are mostly utilised for ceilings and walls in different types of rooms, and it is mostly made up of paper and gypsum. Drywalls that are moisture of mold-resistant contain special coatings. In addition to this, the fire-resistant drywalls are made up of glass.
It is easy to install drywall, and the cost to drywall a room of approximately 1000 sq ft using 1/2″ drywall varied from $1,500-$2,000.


 review: Still the best, only faster")


